Tuesday, December 22, 2009

Almond Strips


This is our new family Christmas tradition, if something can be a tradition that you did once two years ago, and then several times this year. People tend to think these cookies are biscotti when they see them, but they’re not as hard. Still, they are nice for dipping. Maybe we could call them “bis-NOT-ti.”
Taken with only a few tweaks from my trusty Better Homes & Gardens cookbook.


Ingredients
½ cup (1 stick) butter or margarine, softened
2/3 cup sugar (for the cookies in this picture, I used unpacked brown sugar)
2 t baking powder
1 egg
1 t almond extract
1 cup all-purpose (white) flour
¾ cup whole wheat flour
a little milk
½ cup sliced almonds, coarsely chopped

Method
Preheat oven 325 F.
Beat butter with an electric mixer. Add sugar and baking powder; beat till combined. Beat in egg and almond extract till combined. Beat in as much of the flours as you can; stir in the remaining flour.
Divide dough into 4 equal portions. Shape each portion into a 12-inch-long roll. (I find that I can’t actually roll it out with my hands without its falling apart; it’s better to sort of gently squeeze and shape it.) Place 2 rolls 4 to 5 inches apart on an ungreased baking sheet. Using your hands, slightly flatten each to 3 inches wide. Repeat with remaining rolls. Brush flattened rolls with milk and sprinkle with almonds.
Bake in a 325 oven for 15 minutes or till edges are lightly browned. Cut warm cookies diagonally into 1-inch strips. (Put on an oven mitt before you do this, or you may burn your hand on the edge of the cookie sheet as you cut them.) Cool cookies on wire racks. Makes about 40 cookies.

Tuesday, November 17, 2009

Pie Month: Mango Glace Pie

This recipe has never before been posted on this blog because I don't have a good picture. But it is tasty and healthy. Enjoy!

Adapted from the Better Homes & Gardens cookbook recipe for peach glace pie. My changes: reduced the amount of sugar, substitute mangos for peaches. There are turpentiney mangos and there are sweet ones. If you get good ones, they can taste just like peaches.

Ingredients
1 baked pastry shell (i.e. pie crust)
1.5 to 2 kilos mangos (about 5 to 7), cubed
1/3 to 1/2 cup sugar
2 T cornstarch

Directions
For glaze, in a blender combine 1 cup of the mango and 2/3 cup water. (If using apple juice instead of water, you can use just 1/3 cup sugar later.) Cover and blend until smooth. Add enough additional water to the mixture to equal 1 1/2 cups. In a medium saucepan combine sugar and cornstarch; stir in blended mango mixture. Cook and stir over medium heat till thickened and bubbly. Cook and stir 2 minutes more. Cool for 10 minutes without stirring.
Spread about 1/4 cup of the glaze over the bottom and sides of the pastry shell. Layer half of the mango cubes, then half the remaining glaze, then the rest of the mango cubes, then the rest of the glaze. Chill 1 to 2 hours. According the book, the glaze may begin to water out after two hours, but in my experience this takes several days, and our pies never survive that long (I'm the main culprit there. Hey, mangos are a good source of folic acid!)

(The easiest way to get the meat off a ripe mango is to make two cuts on either side of the large central seed. You now have three pieces. One is the seed, still surrounded by lots of meat. Cut as much meat off of it as you can. The other two pieces are each an oval of somewhat leathery skin with meat on one side. Score the meat in a grid shape, then just slide your knife along next to the skin, and the meat will come off, already cubed because you scored it.)

Wednesday, November 11, 2009

Golden Apple-Celery Dip


Stir together 1/4 cup sour cream, 2 T natural peanut butter, and 1 t curry powder. Serve with apples and celery. Serves 2.
The result will not look like this picture, as the picture uses equal parts peanut butter and sour cream and consequently is a lot stiffer.

Sunday, November 8, 2009

Pie Month: Scratch Pumpkin Pie


The post below was originally run on Dec. 6, 2008. We were actually in the States by then, but I had made a scratch pie before we left Indonesia.
This year, we will be at the huge family Thanksgiving gathering that my husband's family holds each year. The person-to-pie ratio there is always extremely low - often more than 1 pie per 2 people - and pumpkin pie, know as "hand pie" because it's firm enough to eat held in your hand - is of course the star.


Above are some labu kuning (local pumpkins) on sale in the wonderful market in Jakarta. In our home city, in Central Kal, you don’t see huge stacks of labu kuning, usually no more than a quarter of a pumpkin sitting forlornly atop the other veggies. A quarter of a pumpkin being all that was available, I bought it hoping it would yield enough pumpkin to make the Better Homes & Gardens recipe below. I also expected that it would take a couple of hours to cook down. To my surprise, in only 45 minutes the pumpkin chunks that I boiled were soft enough to mash and drain. It yielded almost exactly 16 ounces of mashed pumpkin, and I had enough pumpkin pie filling that I had to cook the extra in a little Pyrex bowl. The hardest part was cutting the rind off the extremely hard pumpkin slices.

Seed, peel and cube about ¼ of a labu kuning. Put in a pot, cover in water, and boil 45 minutes or until soft. Drain, mash, and drain again. While the pumpkin is boiling and draining, make the crust. Then proceed with the recipe.

Ingredients
Crust
1 ¼ cups all-purpose flour
1/3 cup shortening (mentega putih)
5 to 7 tablespoons cold water
Filling
16 ounces stewed pumpkin
2/3 cup sugar
1 t ground cinnamon
½ t ground ginger
½ t ground nutmeg
3 eggs, beaten
1 5-oz can (2/3 cup) evaporated milk (NOT sweetened condensed milk)
½ cup milk
1 large square aluminum foil with the middle cut out

Method
Preheat oven 375 F, 190 C.
For crust, put flour in a mixing bowl. Using a pastry blender or fork, cut in shortening till pieces are pea-sized. Sprinkle 1 tablespoon of water over part of the mixture; gently toss with a fork. Push moistened dough to the side of the bowl. Repeat process till all the dough is moistened. Form dough into a ball. On a lightly floured surface, use your hands to slightly flatten dough. Roll dough with a floured rolling pin from the center to the edges into a circle about 12” in diameter. To transfer pastry, wrap it around the rolling pin. Unroll the pastry into a 9-inch pie plate. Ease pastry into pie plate, being careful not to stretch pastry. Trim pastry to ½ inch beyond edge of pie plate. Use the trimmed pieces to patch the pie crust as needed; fold the edge under and crimp as desired.
For filling, in a large mixing bowl combine pumpkin, sugar, cinnamon, ginger, and nutmeg. Add eggs. Beat lightly and carefully with a fork or wire whisk just till combined. Gradually stir in evaporated milk and milk; mix well.
To prevent overbrowning, cover the pastry crust with the aluminum foil with the middle cut out. Crimp or fold foil over the edges of the pie plate until it stays in place. Pull out oven rack; place pastry-lined pie plate on oven rack. Carefully pour filling into pastry shell through the large hole in the middle of the foil. Carefully slide oven rack back in.
Bake in a 375 F oven for about 40 minutes. Carefully remove foil. Bake 10 minutes more or until a knife inserted near the center of the pie comes out clean. (I had to bake much longer than 50 minutes total before the knife came out clean!). Cool on a wire rack. Refrigerate within 2 hours; cover for longer storage. Makes 8 servings.

Thursday, November 5, 2009

Black Bean and Corn Salsa

I know there are better and more authentic recipes for this dish out there. (Share 'em if you've got 'em!) The only benefit of this one is that it's practically instant to make.

Mix equal parts canned black beans, rinsed and drained; canned corn, drained; and Ro-Tel (canned diced tomatoes and chile peppers). If desired, add lime juice and cumin. Chill until serving.

Monday, November 2, 2009

Pie Month: Sweet Potato Pie


I admit it takes some guts for a Yankee to run a Sweet Potato Pie recipe. Southerners are welcome to suggest improvements.
This recipe is only slightly tweaked from the Better Homes & Gardens recipe.
Originally run Feb. 26 of this year.

Ingredients: Crust
1 1/4 cups flour or 1 1/8 cups flour + 1/8 cup wheat germ
1/3 cup shortening
about ¼ cup cold water
Ingredients : Filling
3 medium sweet potatoes (about 1 pound)
a scant ½ cup brown sugar
½ t ground cinnamon
¼ t ground allspice or cloves
¼ t ground nutmeg
1/8 t salt (leave out if likely to clump)
3 slightly beaten eggs
1 cup buttermilk, whey or sour cream

Method
1. Scrub sweet potatoes thoroughly with a brush. Pat dry; prick potatoes with a fork. Bake at 450 Fahrenheit for 40 to 50 minutes or till very tender. Cool till easy to handle.
2. Meanwhile, make the crust: Put the flour in a mixing bowl. Optionally, substitute wheat germ for 1/8 cup of the flour and mix well. Cut the shortening into the flour until the pieces are pea-sized. Move a small amount of the flour mixture to one side of the bowl; moisten with 1 T water and toss with a fork. Continue this process until all the mixture is moistened and tossed; form into a ball. On a lightly floured surface, use your hands to slightly flatten the ball. Roll out into a circle about 12 inches in diameter, flouring the rolling pin as often as necessary to prevent sticking. To transfer the dough, roll it back around the rolling pin and move it gently over the pie plate. Ease the dough into the pie plate, patch as needed, trim, and crimp.
3. Line the dough in the pie plate with a double thickness of aluminum foil. Bake at 450 F for 8 minutes. Remove the foil and bake for another 4 or 5 minutes, or until set and dry (may be less time). Obviously, this baking step can be done while the potatoes are baking.
4. For filling, cut the baked potatoes in half and scoop the pulp into a large mixing bowl. Use a potato masher to mash the pulp. (You should have about 2 cups.) Stir in sugar, cinnamon, allspice or cloves, nutmeg, and salt. Add eggs. Beat lightly with a rotary beater, fork, or whisk just till combined. Gradually stir in buttermilk, whey or sour cream; mix well.
5. Spoon the filling into the partially baked pie shell. If the filling is very liquid, you may want to put the pastry shell on the oven rack first, then pour in the filling to prevent spills.
6. To prevent overbrowning, cover the edge of the pie with aluminum foil. Reduce oven temp to 375 F and bake for 1 hour or until a knife inserted near the center comes out clean. Cool on a wire rack for 30 minutes. Chill in the fridge at least 2 hours before serving. Good with whipped cream!

Saturday, October 31, 2009

Pie Month: Papaya Pie


In honor of Thanksgiving, I'll be rerunning my old pie posts. This one is just for my friends in the tropics, in case you want to make a harvesty pie but don't have pumpkin or sweet potatoes. Originally run Nov. 13, 2008.

This is not my recipe! You can find it here

I did change it a little bit. About 2/3 cup brown sugar, no white sugar. No salt, since with the humidity here salt tends to clump up. I also added 1/8 t ginger, and used a regular crust instead of a graham cracker crust (which, if you had it, would be very good).
What a wonderful recipe for November in the tropics. It tastes harvest-y, like pumpkin or sweet potato pie, not at all like ripe papaya (which I don't really care for). And I got the fruit free from my housekeeper.

Wednesday, October 28, 2009

Greek Style Pork

This one is unaltered right out of Better Homes & Gardens, but it’s too good not to share. The acidity of the tomatoes contrasts nicely with the savory of the oregano and the sweet of the cinnamon and raisins. And it’s simple to make.

Ingredients
1 lb boneless pork sirloin (or 2 – 4 pork chops)
1 T cooking oil
½ of a medium onion, cut into wedges
1 14 ½ oz. can diced tomatoes
½ cup raisins
½ t dried oregano, crushed
½ t ground cinnamon

Method
Trim fat from meat. Cut meat into ½ inch cubes. In a large skillet with a lid, brown meat and onions. You may need to brown the meat half at a time, depending on how much meat you have and the size of your skillet. Drain off fat.
Stir in undrained tomatoes, raisins, oregano and cinnamon. Bring to boiling. Reduce heat and cover. Simmer for 20 to 25 minutes or till meat is tender. If desired, serve atop hot cooked rice. Serves 4.

Tuesday, October 20, 2009

More Banana Bread


This recipe, found on the Taste of Home web site, yields a moister banana bread than the one I posted previously. It's closer to the kind I remember my Dutch-American Grandma making. The secret is the buttermilk.

My changes:
used 1 cup wheat flour and 3/4 cup white, instead of all white
reduced sugar to 1 cup
added 1 t cinnamon
increased bananas to three
used plain yoghurt instead of buttermilk
instead of walnuts, stirred in 1 cup each raisins & chocolate chips
It still came out great.

Monday, October 19, 2009

Autumn Produce


apples & celery!
(I'm still perfecting the dip ... look for a recipe some day!)

Friday, September 25, 2009

Somewhat Chocolate Bread Pudding


My husband likes to bring home those bakery-fresh French bread loaves that supermarkets sell. Problem is, they are usually too much for our small family to finish before they go stale. Also, through our work we get a lot of day-old bread.

So what’s the solution? French toast, of course! Or try this bread pudding. I adapted it from Better Homes & Gardens to make it chocolately and doubled it to accommodate how much bread we had.

I originally tossed 1/3 cup of chocolate chips with the oatmeal and bread cubes, but they sank to the bottom during cooking, creating a delicious but hard-to-clean crust.


Ingredients
6 beaten eggs
3 ½ cups milk
½ cup sugar
3 T cocoa powder
8 cups stale or oven-dried French bread cubes
1/3 cup dry oatmeal

Method
Preheat oven 350 F. In a bowl beat together eggs, milk, sugar and cocoa powder. (I had a hard time getting the cocoa powder to stop rising to the top of the mixture. It might help to mix it thoroughly with the sugar before adding both to the eggs and milk.) In a large baking dish, casserole dish or Pyrex bowl, toss together bread crumbs and oatmeal. Pour egg mixture evenly over bread mixture.

Bake at 350 F for 90 minutes or until a knife inserted near the center comes out clean. If desired, after an hour of cooking, sprinkle the top of the pudding lightly with chocolate chips and additional oatmeal. Cool slightly; serve warm. Store leftovers in the fridge for an instant breakfast.

Sunday, August 16, 2009

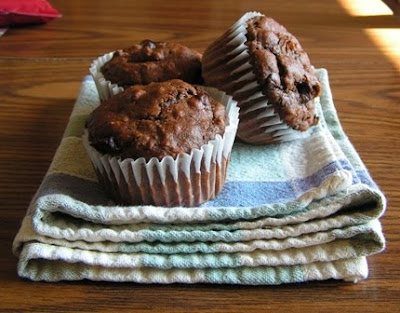
Chocolate-Oatmeal Muffins


Adapted from the basic Better Homes & Gardens muffin recipe.

Ingredients
2/3 cup white flour
1/3 cup wheat flour
¾ cup rolled oats
1/3 cup sugar
3 T cocoa powder
2 t baking powder
1/8 t salt
1 beaten egg
¾ cup milk
¼ cup cooking oil
½ cup chocolate chips

Method
Preheat oven 400 F.
Grease or line with paper liners 12 standard-sized muffin cups.
In a medium mixing bowl combine the flours, oats, sugar, cocoa powder, baking powder and salt. Mix well, make a well in the middle of the mixture, set aside.
In another mixing bowl, beat egg. Add milk and oil, beat again, and add wet mixture all at once to dry mixture. Stir till just moistened (batter should be lumpy). Fold in chocolate chips.
Spoon batter into prepared muffin cups. Bake at 400 F 20 minutes or till a toothpick comes out clean (except for the chocolate chips it will hit on its trip through). Cool in muffin cups on a rack for five minutes. Remove from muffin cups. Because of the oats, these muffins are best served warm. Later they will tend to stiffen up.

Thursday, August 13, 2009

Banana Bread

... or, as my son calls it, "Cake!"

Adapted from the Better Homes & Gardens cookbook. This recipe contains 1/3 of the sugar.

Banana bread always reminds me of my Dutch grandmother. Supper at her house often consisted of cold cuts and cheese; carrots, celery, and olives; and banana or zucchini bread served with real butter that was soft from sitting out.

Ingredients
1 cup white flour
½ cup wheat flour
1 ½ t baking powder
¼ t baking soda
1 t cinnamon
1 cup mashed bananas (3 medium)
¼ cup sugar
1 egg
¼ cup apple juice plus 1 – 2 T cooking oil
1 t finely shredded lemon peel (optional)
½ cup chopped walnuts or pecans
(for the loaf in the photo above, I used raisins instead)

Method
Preheat oven to 350 F. Grease bottom and ½ inch up the sides of an 8x4x2-inch loaf pan.
In a medium mixing bowl combine flours, baking powder, baking soda, and cinnamon. Make a well in the center of the dry mixture.
Slice bananas into another mixing bowl. Add sugar and mash with a potato masher. If the bananas are nearly overripe, this method will work well. Beat the egg with a fork in a measuring cup and add to the banana mixture; in the same measuring cup, measure apple juice and oil, and add to the banana mixture. Add lemon peel if desired, and stir the banana mixture thoroughly.
Add banana mixture all at once to dry mixture. Stir till just moistened (batter should be lumpy). Fold in the nuts.
Spoon batter into prepared pan. Bake at 350 F 50 to 55 minutes or until a toothpick comes out clean. Cool in pan 10 minutes on a wire rack. Remove loaf from pan; cool on rack. Wrap and store overnight.

Tuesday, August 4, 2009

Broccoli Salad

Broccoli is supposed to be one of those “super foods” that has so many nutrients in it that we should eat it every day.

This is a family recipe from my husband’s side. I didn’t know about it until this summer, but it’s easy and tasty. I hope they will forgive me if I get it wrong. The purple of the red onion makes a beautiful color combination with green broccoli. Even my baby son likes this salad. He eats the raisins and does his level best with the broccoli before giving up and spitting it out.


The optimum time to make this salad is said to be 2 hours before serving. It can keep in the fridge a day or two, but after that is not so good.

Ingredients
2 heads of fresh broccoli
¼ to ½ of a red onion
¼ cup raisins
¼ cup sunflower seeds, or chopped pecans or walnuts
¼ to ½ cup slaw dressing, mayo, or Miracle Whip

Method
Wash the broccoli and chop into bite-sized florets, reserving stems for another use if desired. Thinly slice and, if desired, rinse and drain the red onion. Toss the broccoli, onion, raisins, and seeds or nuts in a large serving bowl. (Alternatively, seeds or nuts may be added as a garnish, or served on the side.) Add the dressing and mix thoroughly. Store in the fridge until serving. Serves four to six.

Friday, July 10, 2009

Easiest Side Dish in the Kitchen

String beans are called "boonchees" in Indonesia, and "half-runners" in Ohio. What's your local name for them?

Ingredients
1/2 lb string beans, fresh or frozen
2 Tablespoons butter
1 Tablespoon lemon-pepper seasoning

Method
Wash and string the beans, if necessary, and cut to desired length. Ten minutes before serving time, put them in a saucepan with an inch of water. Bring to the boil, cover, and simmer ten minutes. Meanwhile, place butter and lemon-pepper seasoning in the bottom of the serving bowl. When the beans are crisp-tender, drain them and dump them, still hot from the colander, into the serving bowl. Stir until the butter and lemon-pepper seasoning are evenly distributed, and serve. Serves two to four.

Saturday, June 27, 2009

Cucumber-Mint Salad

I got this recipe from a “how to cook Indonesian” cookbook years ago, and re-made it from memory the other day, to go with the sate-style chicken below. The freshness complements the chicken’s heavy flavors.
(To be honest, I never had a real Indonesian serve me a salad like this. They would usually serve diced cucumber, shallots and bird's-eye peppers floating in 20%-acetic-acid vinegar with no sugar added.)

Ingredients
4 cucumbers
¼ red onion, minced (optional)
¼ cup fresh mint leaves
¼ cup white vinegar (5% acetic acid)
3 T brown sugar or palm sugar

Method
For each cucumber, peel, cut in half crosswise, then lengthwise. Stand the cucumber quarters on end and use a spoon to scoop out the seeds. Discard seeds; slice the cucumbers thinly. You should get little crescent-shaped pieces. Place in a large bowl.
Mince the onion and add to the cucumber.
Wash the mint leaves, pat dry, and chop. Mix with the cucumber. (Shown)
Measure the vinegar into a measuring cup. Add the 3 T brown sugar and stir until dissolved. Pour over the cucumber and mint; stir. Cover and store in the fridge, stirring periodically so that all the cucumber gets a chance to marinade.

Thursday, June 25, 2009

Sate-Style Chicken in Peanut Sauce


Indonesian "sate" is street food served in roadside booths in the evening. It consists of chicken ‘bits’ skewered on bamboo sticks and grilled over hot coals. (If you try this method, you should soak the sticks first so they don’t catch on fire.) So that the meat will cook quickly, the chicken pieces in Indonesian sate are generally very small. One bamboo skewer will typically contain a few pieces that are meat, a few that are mostly skin, and a few that are organ meats. This recipe was adapted to American tastes and recommends boiling the chicken because that is the fastest method and will produce tender juicy meat.
Ingredients
6 to 8 chicken breasts or other meaty pieces, + 2 cups reserved broth
2 jars all-natural peanut butter (1 crunchy, 1 smooth)
¼ onion, finely minced or grated (optional)
8 - 10 cloves garlic, minced or grated
6 – 8 tablespoons soy sauce
10 tablespoons brown sugar
6 – 8 teaspoons hot pepper sauce (optional)
Method
Boil chicken in a large pot. If necessary, debone and boil further until no pink remains. Reserve 2 cups broth. Cool chicken and cut into bite-sized pieces.
Meanwhile, add peanut butter, reserved broth, onion, garlic, soy sauce, sugar and hot pepper sauce (if using) to another pot. For hot sauce and sugar, add a little at a time, tasting in between. Cook on medium heat, stirring, until the ingredients combine to produce a sauce. If necessary, add more water as the sauce cooks to achieve the desired consistency. Add chicken to sauce, stir, and heat through. If desired, serve with rice, extra soy sauce and extra hot sauce. To make it really Indonesian, the beverage should be iced tea.

Monday, June 22, 2009

Baby Carrots on Snopes

I eat a lot of baby carrots. So this was moderately disturbing.

Saturday, June 20, 2009

"Dad"cakes

Don’t tell Dad, but the wheat flour, wheat germ, and yoghurt in this recipe make the cupcakes … not health food certainly, but at least not quite so bad for Dad.

Ingredients
cupcakes
1 c. white flour
½ c. wheat flour
1 T wheat germ
½ c. cocoa powder
1/3 c. sugar
1 t baking soda
1 t baking powder
2 eggs
2/3 c. milk
2/3 c. oil
2/3 c. plain low-fat yoghurt
1 t. vanilla
frosting
¼ c. natural peanut butter (containing peanuts only)
1/3 c. butter (softened)
1 to 1 ¼ cup powdered sugar (confectioner’s sugar)
mini M&M’s

Method
Preheat oven 350 F. Line 2 cupcake pans (for 24 cupcakes) with liners, or grease and flour. I had better luck with metallic liners than with paper.
In a large bowl mix or whisk together dry ingredients for cupcakes. In a separate bowl, beat eggs. Add milk and oil; beat again. Make a well in the center of the dry mixture. Add the egg mixture, and mix or beat until smooth. Add the yoghurt and vanilla and stir until thoroughly mixed.
Drop dough by scant ¼-cupfuls into the cupcake pans. (1/4 cupful should fill each cupcake liner about 2/3 full.) Bake at 350 F for 19 minutes or until a toothpick comes out clean. Cool in the pan 5 minutes. Carefully transfer cupcakes to cooling racks and cool completely before frosting.
For frosting, cream together peanut butter and softened butter. Add powdered sugar ¼ cupful at a time until you get a stiff, spreadable frosting. I ended up adding a total of 1 ¼ cups of powdered sugar, and it made more frosting than I needed for the cakes.
Frost cakes with the peanut butter frosting. Decorate with mini M&M’s in the colors of your choice (yellow does not look very good). In the States, you can buy M&Ms in just one or two colors at some candy or party stores. Or get a child to help you go through the bag and sort the M&Ms into color piles. Even with mini M&Ms, the cupcakes were not big enough to allow me to spell out “Dad.” But you can put Dad’s initial, or a heart or design as shown.
Serve immediately or store in the fridge for up to 24 hours before the frosting begins to melt and the M&Ms begin to bleed.

Sunday, June 14, 2009

Book Review: In Defense of Food


In Defense of Food: An Eater’s Manifesto, by Michael Pollan, 2008

It was in 2006 that I first heard the term “trans fats.” Returning to the U.S. after a four-year absence, we discovered that many food products now boasted they had “none” of something we had never before heard of. A new food baddie had been discovered, or perhaps made up. This constant turnover in nutritional buzzwords is one aspect of a wider phenomenon which Michael Pollan critiques in his book.

Pollan’s basic thesis is that the nutrient-by-nutrient approach to healthy eating has served to confuse consumers by taking nutrition out of the realm of common sense and putting it in the hands of the experts, those scientists who alone can detect the nutrients that are invisible to the naked eye. The same approach has been very profitable to the processed-food industry. If the experts say a nutrient is bad, manufacturers can find a way to remove it from their products. If the experts say a nutrient is good, it can be added to just about anything.

The problem, says Pollan, is that foods are probably greater than the sum of their parts, and certainly greater than the sum of the very limited number of nutrients that have so far been discovered. That’s why taking a supplement that contains vitamin C, vitamin A, and folic acid is not as good for you as eating a carrot. It’s a classic case of scientific reductionism. Reductionism fails again and again, but the modern dream lives on. We keep trying to use our limited knowledge of science to make foods that are better than the plant and animal foods that God causes to grow right out of the ground for us. And of course the foods we make are always much worse than the God-given foods, though sometimes it takes us decades to figure this out. So we spent a generation eating hydrogenated vegetable oils, now known as trans fats, because the experts told us that they were better for us than lard. That's right, lard. Pollan demonstrates that they're actually much worse for us. Than - I must say it again - lard. That was the biggest surprise in the book, for me.

(An interesting side note: part of the blame for Americans’ susceptibility to the notion that basic, natural foods such as meat and cheese could be unqualifiedly bad, can be laid at the door of the church. There has been a strain of asceticism that keeps popping up in the church at various times and places that mistrusts the enjoyment of food, viewing such sensual pleasure as an indulgence of people’s “animal nature.” Its roots lie in the acceptance of the ancient Greek notion that matter is evil and spirit is good. This notion, by the way, is in defiance of the Bible which teaches us that “the kingdom of heaven is not a matter of what we eat or drink” and that “God gives us all things richly to enjoy.” This mistrust of table pleasures goes way back, but it flowered in the modern age in such characters as the Seventh-Day Adventist John Harvey Kellogg, whose contributions to American food faddism Pollan briefly documents [56 – 57]. Just more proof that error in the church can have bizarre, long-term effects in the greater culture.)

Pollan closes his book with some rules of thumb that can be summarized: “Eat Food. Not Too Much. Mostly Plants” and include injunctions like “don’t eat anything your great-grandmother wouldn’t recognize as food.” So: hooray for steak! Hooray for eggs and fish and chicken! Hooray for milk and yoghurt and real cheese (not “cheese food”)! And double hooray for apples and cantaloupe and peppers and tomatoes and cherries and sweet corn and mangos and squash and carrots and watermelon. And lest you think I am a food puritan, hooray for homemade cake as well.

Wednesday, June 10, 2009

Cupcakes are hot

They made the cover in a recent Winter issue of Taste of Home magazine. They featured in a 2007 Reader's Digest "100 Best" article. And in the April 09 Family Circle's recipe contest, the winners in the Cakes and Desserts divisions were both cupcake recipes.
The trend seems to be huge gobs of frosting. Fine with me.
My sister suggested we make these for a family party. Hers was the vision of cupcakes in bold colors. We just made them from a mix. We whipped up our own frosting with shortening, butter, powdered sugar. Then for each cupcake we used a knife to spread a thin layer of frosting for a base, then we piped on the stars using a very large pipe tip. The final touch was sprinkling them with clear sugar ... also my sister's inspiration. They went like, well ... cupcakes.

Tuesday, May 12, 2009

Minty Pasta Salad

Try this recipe with thinly sliced celery in place of the water chestnuts. If you like a kick, add thin slices of the hot pepper of your choice.

Ingredients
6 oz. (1/2 box) whole-wheat pasta spirals
1 15-oz can pineapple chunks
2 cans tuna in water
1 can sliced water chestnuts (optional)
4 or 5 very thin slices red onion, chopped
4 or 5 stalks of fresh mint
½ cup light mayo or Miracle Whip
dash lemon juice (optional)
additional mint

Method
Boil water in a pot and cook the pasta for 12 minutes or until done. Meanwhile, open the pineapple and tuna, and drain in a strainer. In a large bowl combine the pineapple chunks, tuna, water chestnuts, and red onion. Rinse the mint, pat dry, and remove the healthy leaves. Chop them coarsely and add them to the bowl. Add the mayo, with a dash of lemon juice if desired, and mix.
When the pasta is done, drain it in the strainer, rinse in cold water and drain again. Add it to the bowl and mix well. Transfer to a serving bowl and chill until serving time. Garnish with additional mint, if desired. Serves four.

Monday, May 11, 2009

Initial Pancakes


My dad used to make us pancakes shaped like our initials. Perhaps someone in your household does this as well. Of course, some kids' initials are easier to make a pancake out of than others. So, if you want it to be really easy, don't name your kid something that starts with M, E, or S.
My father-in-law usually does this just for the grandkids, but the other day he made one for me!
It's just one of those simple creative things you can do that brings joy to the members of your family all out of proportion to the effort it took.

Monday, May 4, 2009

Bangladeshi Sweet Chicken Curry with Yoghurt


This is another recipe from Extending the Table, successor to the popular More with Less Cookbook. The original recipe calls for 3 onions and a whole 3-lb chicken. I have adjusted these amounts. For the spices, cardamom is expensive and I didn’t have coriander on hand, so I made it without these two spices and it was still good. I also served the ground red pepper on the side instead of adding it to the dish while cooking, to please the tender palates in my family.

Ingredients
½ to 1 onion, chopped
3 cloves garlic, minced

Spices:
½ t ground ginger or 4 slices ginger root, grated
5 – 6 whole cloves or ½ t clove powder
5 -6 whole cardamom pods or ½ t ground cardamom (optional)
1 – 2 cinnamon sticks or 1 t ground cinnamon
1 t ground coriander (optional)
1 t ground cumin
¼ to ½ t ground red pepper
1 t salt

1 to 1 ½ lb chicken, whatever cuts you like best (I use breasts or tenders), skinned and cut in pieces
1 cup yoghurt or buttermilk
2 T shredded coconut
2 T raisins (optional)
1 cup water (optional, for more sauce)
additional yoghurt, buttermilk or sour cream, if desired

Method
Select a heavy pan with a lid that seals. Heat 2 T oil and fry the onion and garlic until soft and lightly brown. Add the spices, including salt, and fry about 2 minutes, stirring constantly. Add the chicken, and brown on all sides. Mix and add yoghurt or buttermilk, coconut, raisins, and water. Cover and simmer 35 – 45 minutes for larger chicken pieces such as legs and thighs, 20 – 25 minutes if you have cut the meat into bite-sized pieces.
Despite the yoghurt or buttermilk, this recipe makes a watery, not a creamy, sauce. I suggest that instead of adding 1 cup of water before simmering, you wait until the end and then stir in about ¼ cup additional yoghurt, buttermilk, or sour cream just before serving. That will yield a creamier sauce.
Serve hot over rice. Serves two to four.

Wednesday, April 15, 2009

Resurrection Cookies


It may seem pretentious to name a cookie for the resurrection, but I stand in a long tradition of symbolic foods, such as colored eggs and pretzels.
In these lemon-chocolate cookies, the dark of the chocolate is supposed to represent the black period during which Christ was dead, and the sunny gold and white of the rest of the cookie is the joy of His resurrection.
I got lazy and didn’t wait for the chocolate to become completely liquid before I dipped the cookies. If you have more patience, perhaps you can create a cookie of which exactly half is bathed in a smooth layer of dark chocolate.
You can experiment with variations, such as separating the diamonds before baking (this will probably reduce baking time) and cutting other shapes.

Ingredients
2 cups flour
½ cup cornmeal
zest of one lemon
6 tablespoons sugar
1 cup butter (2 sticks)
¼ bag semisweet chocolate chips
about 9 – 12 teaspoons powdered sugar (confectioner’s sugar)
about 4 – 5 teaspoons lemon juice

Method
Preheat oven to 325 Fahrenheit.
In a mixing bowl combine flour, cornmeal, lemon zest, and sugar. Using a pastry cutter, cut in the butter until mixture resembles fine crumbs and starts to cling. Form the mixture into a ball and knead until smooth. Divide in two.
On an ungreased cookie sheet, pat or roll half the dough to ½ inch thick. Cut into diamond shapes by making parallel horizontal cuts, then parallel diagonal cuts. On the edges you will have some triangle shapes. Do not attempt to pull the diamonds apart; leave them together. Repeat the process with the other half of the dough on a second cookie sheet.
Bake at 325 for 25 minutes or until the center is set and the edges are just faintly starting to brown. Remove from the oven; cool for 10 minutes on the cookie sheet; then re-cut the diamonds along the grooves. Carefully pry apart and transfer to a wire rack to cool. The tips of the diamonds will tend to crumble.
While the cookies are cooling, slowly melt the chocolate chips over low heat in a saucepan. When the chocolate has reached the desired consistency, dip the cookies into it one at a time. I found that dipping one side of the cookie, with a swiping motion, was better than trying to dip it so that one corner of the diamond was completely covered, because the point would tend to fall off in the chocolate. If you come up with a trick for this, let me know!
After dipping, place the cookies on a plate with waxed paper and let them chill in the fridge while you dip the next batch.
When all the cookies are chilling, make the lemon frosting. I did this by putting 3 t powdered sugar in a little bowl, then adding lemon juice ½ teaspoon to 1 teaspoon at a time until I got the desired consistency. Then I drizzled it over the cookies, one batch at a time, making more lemon frosting as needed.
Return the cookies to the fridge until it is time to serve them. After that, store them at room temperature in a sealed container. They won’t last long. This recipe makes about 30 cookies.


P.S. As of Easter 2010, I am FINALLY starting to figure out that the chocolate needs a little parafin in it to make it go on as smoothly as I'd envisioned. I will experiement and post an update when I've confirmed that this is the thing needed ...

Saturday, April 11, 2009

Animal Print Eggs

Boil the eggs for 20 minutes, cool in ice water, dry. Draw on the animal print with a black crayon (except be sure you have a model to look at so that your leopard print looks better than mine!). Soak in yellow or orange egg dye until the desired shade is reached. Drain; allow to dry.

Pretty Healthy Chocolate Chip Cookies

We had a cold snap for a few days here, so I had to bake! These cookies are based on Better Homes & Garden’s “Peanut Butter Oatmeal Rounds,” but with quite a few tweaks to make them healthier. You cannot taste the peanut butter in the final product, they just taste like oatmeal-chocolate chip cookies.

Ingredients
¼ cup butter or margarine
½ cup peanut butter
½ cup granulated sugar
½ cup brown sugar (not packed)
1 teaspoon baking powder
½ teaspoon baking soda
2 eggs
½ cup apple juice
1 ¼ cups all-purpose flour
1 tablespoon wheat germ
2 cups rolled oats
1 cup carob chips or semisweet chocolate chips

Method
Preheat oven to 375 Fahrenheit, I believe that’s 190 Celsius.
In a large mixing bowl beat butter or margarine and peanut butter till combined. (In the tropics, the butter and peanut butter will soften so much that you can do this by hand with a potato masher, aided by a rubber scraper to clear the masher occasionally.) Add the granulated sugar, brown sugar, baking powder, and baking soda. Beat until combined, scraping the sides of the bowl occasionally.
Beat in the eggs and apple juice till combined. If mixing by hand, beat the eggs separately with a whisk first. At this point the mixture will be very wet, but don’t worry; it will stiffen up as you beat or stir in the flour and wheat germ.
Finally, stir in the rolled oats and the carob or chocolate chips.
Drop dough by rounded teaspoons on an ungreased cookie sheet. You may find it helpful to chill the dough first so that it’s not so sticky. Bake at 375 about 10 minutes or until edges are lightly browned. Cool 10 minutes on the cookie sheet, then transfer to a wire rack to cool. Makes 30 to 40 cookies.

Wednesday, April 8, 2009

Mulligatawny Soup


I can’t believe I’ve never tried to make this before. It would have been perfect for our lifestyle in Indonesia, because all the ingredients are easy to find in our town there. It remains a quick, healthy, tasty soup for anyone. I got this recipe from the Better Homes & Gardens cookbook, where it is called Easy Mulligatawny Soup. I substituted sausage for their 1 ½ cups chopped cooked chicken or turkey. I also changed the amounts of various vegetables slightly to make them easier to remember. (I also left out the rice when I made it, because I didn’t know how long the soup would need to simmer before serving, and was planning to serve corn bread on the side.)

Ingredients
2 ½ cups chicken broth (or 2 ½ cups water plus two bouillon cubes)
1 chopped apple
2 chopped carrots
1 7 ½ -ounce can tomatoes, cut up, or three Roma tomatoes, chopped
1 stalk celery, chopped
1/3 cup rice
½ onion, chopped
¼ cup raisins
1 T (tablespoon) snipped fresh parsley
1 to 2 teaspoons curry powder
1 t lemon or lime juice
¼ teaspoon black pepper
1/8 t ground mace or nutmeg
1 ½ cups chopped cooked chicken or turkey,
OR a Polish sausage or four hot-dog style sausages

Method
In a large saucepan combine chicken broth, apple, carrots, undrained tomatoes, celery, uncooked rice, onion, raisins, parsley, curry powder, lemon juice, pepper, mace or nutmeg, and 1 cup additional cup water. Bring to the boil; reduce heat. Cover and simmer about 20 minutes or until the rice is tender.
Meanwhile, if using sausage, bias-cut the sausage into pieces about ¼ inch thick, place in a frying pan, and brown on all sides.
If using cooked chicken or turkey, add the meat when the rice is done, heat through, and serve.
If using sausage, reheat the sausage in the pan, add to the soup and serve immediately. Remember not to add the sausage until the last minute or it will become less appetizing. Also, if using rice, do not let the rice sit in the soup a long time after it is done, as it will continue to absorb the broth.

Serves 4.

Monday, March 30, 2009

Hooray for Frozen Spinach!

It costs about 75 cents for a box the size of two decks of cards. I thaw it by running it under hot water, break it into chunks about the size of two tablespoons, and freeze each chunk in a 6x3-inch plastic bag.
Then I can pull out a bag, thaw it, and put the spinach in scrambled eggs while they are cooking ... making a fritatta! By the time I add a ton of cheese, you can't taste the spinach anyway.
I have also added spinach, plus the juice of half a lemon, to Cambell's chicken soup for an instant Greek chicken soup.
You can also put it on pizza (I haven't done that yet) and sneak it into spaghetti sauce (guilty).

Friday, March 20, 2009

How To Home-Carve a Pineapple


OK, maybe you already know how, but I didn't until I learned it in Indonesia. My work is not the prettiest example of the technique you'll ever see. An Indonesian could carve up a pineapple so the result is gorgeous, even spirals all the way around, and the resulting slices are perfectly notched on the edges. With a machete.

First, cut off the head and base of the pineapple.


Stand the pineapple on end and slice off the skin, top to bottom, not too deeply. Your slices should take off all the skin but leave the little hairy brown dimples.

The hairy brown dimples run in a corkscrew pattern from the top of the pineapple to the bottom. Pick one row and follow it down, making two diagonal cuts just deep enough to remove a wedge of flesh that includes the brown dimples.


Continue with the other rows of dimples.

The end result with be a pineapple with elegant corkscrew grooves. Or in this case not so elegant.


Now lay the pineapple on its side and cut thin slices. Each slice will be round with notched edges. There is no way to "home-core" a pineapple, so your guests will have to cut the flesh off the hard core with a fork before they eat it. If it was important, I guess you could try your luck with a cookie or biscuit cutter.

Sunday, March 8, 2009

Village Pancakes

Here is how we used to make pancakes while living in the village. We brought in the dry ingredients, and bought the eggs and oil on site. We had a 2-burner LPG stove, a little kettle for hot water, and this all-important Nalgene brand screw-top bottle. Note that it has 2-0z marks on the right side.

Ingredients

6 t powdered milk
2 cups flour
4 t baking powder
1 - 2 T sugar
2 oz (1/4 cup) oil
2 eggs

Method
Heat water in the kettle until warm but not boiling. Pour warm water into the Nalgene bottle up the 12 0z mark (1 1/2 cups). Add the 6 t powdered milk, close the lid, and shake vigorously to mix the milk. Open the lid and allow the milk to cool slightly while you measure the flour, baking powder, and sugar into a bowl.

Optionally, substitute cornmeal for 1/2 cup of the flour. You may also add 2 T wheat germ, if you have it. Mix the dry ingredients thoroughly and make a well in the center.

Slowly pour 2 oz (1/4 cup) of oil into the bottle. It should settle on top of the milk. Now crack the eggs, one at a time, into the bottle. (If there is a chance the eggs might be bad, crack each one into a glass before pouring it into the bottle.) Close the lid and shake vigorously until the milk, oil, and eggs are well blended. If you used warm milk, the mixture will foam up to a greater extent than shown here.


Pour the egg mixture into the well in the dry mixture. Stir until just moistened; batter should be lumpy. Drop by 1/4 cupfuls onto a hot skillet. Turn each pancake when very bubbly. They will rise quite a bit; wait about 30 seconds after each one rises to take it off the skillet. Makes about twelve.

Thursday, March 5, 2009

Frank's Red Hot Tuna


Now that it's Lent, we need a fish recipe!
This recipe makes use of the well-blended flavor of Frank’s RedHot Sauce. It is not a very hot sauce for its volume. If you substitute Tabasco, you should use smaller amounts. Other than Frank's, all the ingredients in this dish are available in our town in Indonesia. We used to have it frequently. I've made it with Frank's, Tabasco, and simply with cabe rawit, the tiny hot "bird's eye" peppers.
This recipe was inspired by Indonesian canned "pepper tuna," but it is more suited to American tastes. A true Indonesian recipe would have sugar and fish sauce.

Ingredients
1 onion or 4 green onions, chopped
2 – 3 cloves garlic, sliced thinly into “coins” but not minced
3 cabe hijau or one green pepper, seeds removed and cut into strips
2 – 3 glugs cooking oil
1 can tuna in water, undrained
1 Tablespoon Frank’s, original flavor
2 tomatos, diced
1 T tomato paste and ¼ cup water (optional)
3 - 4 T Frank’s
2 teaspoons lemon or lime juice (optional)
1 t cumin
1 packet chicken boullion granules, MSG, or 1 block chicken boullion starter (optional)
salt and pepper to taste
ground red pepper (optional)

Directions
In a pan fry onion, garlic, and pepper in oil until soft. Add tuna; mix and fry briefly. Add 1 T Frank’s, mix, and allow to fry briefly. Meanwhile, cut up tomatos. Add tomatos and/or tomato paste and water, mix, and allow to fry while you measure and add the remaining 3 T Frank’s, lime juice, cumin, boullion granules, salt and pepper. At this stage, you can optionally add ground red pepper to taste to produce a hotter result. Mix well, form into a mass in the center of the frying pan, and allow to simmer 20 minutes for flavors to blend. Serve over rice. Serves 2 to 3.

http://www.franksredhot.com/

Thursday, February 26, 2009

Sweet Potato Pie

As a pregnant lady, I need folic acid. (Found in mangos, peaches, pumpkins, broccoli & sweet potatoes. According to the book What To Eat When You're Expecting. See http://www.family4life.com/Images/whattoeat_when_expecting.htm )
And right now we have a crate of sweet potatoes sitting in our basement. And I have a sweet tooth.
This recipe is only slightly tweaked from the Better Homes & Gardens recipe.
Ingredients: Crust
1 1/4 cups flour or 1 1/8 cups flour + 1/8 cup wheat germ
1/3 cup shortening
about ¼ cup cold water
Ingredients : Filling
3 medium sweet potatoes (about 1 pound)
a scant ½ cup brown sugar
½ t ground cinnamon
¼ t ground allspice or cloves
¼ t ground nutmeg
1/8 t salt (leave out if likely to clump)
3 slightly beaten eggs
1 cup buttermilk, whey or sour cream

Method
1. Scrub sweet potatoes thoroughly with a brush. Pat dry; prick potatoes with a fork. Bake at 450 Fahrenheit for 40 to 50 minutes or till very tender. Cool till easy to handle.
2. Meanwhile, make the crust: Put the flour in a mixing bowl. Optionally, substitute wheat germ for 1/8 cup of the flour and mix well. Cut the shortening into the flour until the pieces are pea-sized. Move a small amount of the flour mixture to one side of the bowl; moisten with 1 T water and toss with a fork. Continue this process until all the mixture is moistened and tossed; form into a ball. On a lightly floured surface, use your hands to slightly flatten the ball. Roll out into a circle about 12 inches in diameter, flouring the rolling pin as often as necessary to prevent sticking. To transfer the dough, roll it back around the rolling pin and move it gently over the pie plate. Ease the dough into the pie plate, patch as needed, trim, and crimp.
3. Line the dough in the pie plate with a double thickness of aluminum foil. Bake at 450 F for 8 minutes. Remove the foil and bake for another 4 or 5 minutes, or until set and dry (may be less time). Obviously, this baking step can be done while the potatoes are baking.
4. For filling, cut the baked potatoes in half and scoop the pulp into a large mixing bowl. Use a potato masher to mash the pulp. (You should have about 2 cups.) Stir in sugar, cinnamon, allspice or cloves, nutmeg, and salt. Add eggs. Beat lightly with a rotary beater, fork, or whisk just till combined. Gradually stir in buttermilk, whey or sour cream; mix well.
5. Spoon the filling into the partially baked pie shell. If the filling is very liquid, you may want to put the pastry shell on the oven rack first, then pour in the filling to prevent spills.
6. To prevent overbrowning, cover the edge of the pie with aluminum foil. Reduce oven temp to 375 F and bake for 1 hour or until a knife inserted near the center comes out clean. Cool on a wire rack for 30 minutes. Chill in the fridge at least 2 hours before serving. Good with whipped cream!

Friday, February 13, 2009

Cheesy Broccoli with Curry

This is another one I could never make in our home city (no broccoli or cheese soup), but I made it tonight here in the Great North.

Ingredients
2 heads broccoli
1 can of cheese soup (e.g. Campbell's)
2/3 can of milk
1/2 t curry powder
dash paprika
1/4 to 1/2 cup grated cheese (optional)
wheat germ

Method
Preheat oven 375 Fahrenheit. Cut the broccoli into florets (or use all of it if you like), put in a pan with a little water, bring to the boil, and simmer, covered, for 10 minutes. Meanwhile, grease an 8x8 glass baking dish.
When the broccoli is slightly tender, drain. Place the broccoli evenly in the bottom of the baking dish. Into the same pan you used for the broccoli, empty the canned cheese soup and the 2/3 can of milk. Or, if there is no canned cheese soup available, make a thickish white sauce with about 1 2/3 cups milk. Add the curry powder and paprika; mix thoroughly over low heat.
Pour the curry mixture over the broccoli in the baking dish. Optionally, sprinkle the cheese over the top. Then sprinkle with generous amounts of wheat germ.
Bake for about 20 minutes or until bubbly on the edges. The curry will not be a strong flavor, but will give it a certain je-ne-sais-quoi - except that you, the cook, sais.

Saturday, January 24, 2009

"Jus Apulkat" (Avocado-Chocolate Smoothie)


Jus Apulkat means an avocado smoothie. Confusing as it may be to English speakers, in Indonesia jus (“juice”) means a smoothie and es (“iced”) means juice. So jus jeruk = an orange smoothie, and es jeruk = freshly squeezed orange juice with ice. This has tripped me up at least once, long after I should have known better.
Whatever you call it, this is a surprisingly good and filling chilled treat. I added my own twist with the whipped cream.

Ingredients
meat of 1 small avocado
about 2/3 cup water
4 - 5 tablespoons sugar
chocolate syrup

Method
Place the avocado in a blender with the water and sugar. Blend until completely smooth, adding small amounts of additional water as necessary to achieve a thick but drinkable texture.
To serve, squirt two or three lines of chocolate syrup down the sides of a tall glass. Pour in the avocado, then add another shot of chocolate syrup in the middle. Or, if like me today you can’t find the chocolate syrup, layer chocolate chips in with the avocado drink, parfait-style. (Yes that's what those black things are!) Serve with a long spoon.

Don’t knock it ‘till you’ve tried it!

Monday, January 19, 2009

Pretty Healthy Carrot Bread


This recipe is adapted, with many tweaks, from the Better Homes and Gardens Zucchini Bread recipe. It’s quick to prepare, and satisfied my sweet tooth many a day.

When in Indonesia, I keep bags of shredded carrots (each containing one cup) in my freezer. To thaw them, I remove the carrots while still frozen, put in a bowl, and thaw in a little apple juice.

Ingredients
1 ½ cups flour
1 teaspoon cinnamon
½ teaspoon baking soda
¼ teaspoon baking powder
¼ teaspoon ground nutmeg (optional)
½ cup brown sugar or palm sugar
1 cup finely shredded carrots
¼ cup apple juice plus a few tablespoons cooking oil
1 egg
½ cup raisins (optional)

Method
Preheat oven 350 Fahrenheit, 180 Centigrade.
Grease bottom and ½ inch up the sides of an 8x4x2 inch loaf pan; set aside.
In a medium mixing bowl combine flour, cinnamon, baking soda and baking powder, and nutmeg.
In another medium mixing bowl, whisk egg. Beat in apple juice and oil. Add sugar and shredded carrots; mix well. Add the wet mixture to the dry mixture (or vice versa); stir till just moistened. Stir in raisins.
Spoon into prepared pan. Bake until a wooden toothpick comes out clean, about 1 hour. Cool in the pan on a wire rack for 10 minutes. Remove loaf from pan. Cool completely on the rack. Makes 1 loaf (about 10 servings).